As I mentioned in an earlier post back in December I had FIOS installed. One of the benefits of this was that my telephone service was upgraded to include caller id. While our cordless telephones were all caller id capable there is not a telephone located by every PC in our house and when not in use the telephones normally sit in their charging cradles. This got me started on a project to broadcast caller id across our home network so that we could determine who was calling before we got up to get the phone.
As with many projects the start of this one found me sitting at my computer running Google searches to see what others had done in this area. I found several but couldn’t get any to work with the modem sitting in my PC. This led me down the path of developing my own.
I had run across Qt a while ago and had wanted to do a project to try it out. For anyone who doesn’t know what Qt is it is a “Qt is a cross-platform application and UI framework” for c++. Qt had recently come under the control of Nokia after Nokia had purchased Trolltech which originally developed the library. One notable result of the acquisition were changes to Qt Licensing which is now available under Commercial, LGPL and GPL licenses. Qt comes with it’s own IDE Qt Creator as well as an extensive number of examples.
My project consists of a Windows Service that monitors a Conexant D850 modem in my Dell PC running Windows 7. The modem is monitored by a Windows service that reads the caller id information and then broadcasts it across the network. All of the PCs in my house are running a client that picks up the broadcast and generates a tool tray icon message.
While I have over 30 years of experience working and tinkering with computers my c++ experience is just slightly above basic level. Even at that level the Qt framework was very easy to use and within a couple of evenings and weekend afternoon or two I had the project to the point where it could be deployed.
The biggest problem I had was that in the middle of developing the software I replaced the PC I was using and found that after transferring the modem I was not receiving caller id. After much troubleshooting I found out that I needed to downgrade the driver. For anyone running a Coexant D850 PCI V.92 Modem if you want Caller ID information be sure and use version 7.74.0.0 dated 5/27/2008.
At this time I haven't come up with any place to post the code but if you are interested in a copy let me know in the comments section and I will be happy to provide it to you.
Sunday, March 7, 2010

Tuesday, March 2, 2010
Time Flies – January and February 2010
Wow, my last post was back in December.
Since my last post I have worked on the projects below. I will try and get some details posted.
1) Program in c++ to read Caller ID off the modem in my PC and broadcast it to a client that is now installed on all PCs in the house. That way if you are on a PC when the phone rings you can see who is calling.
2) Started putting together a PVR using an old Windows XP PC and a Hauppauge card. I tried various open source packages but for now am using the WinTV package that came with the card.
3) To beat the winter blues of having to ride inside I worked at interfacing my bicycle to an Ardunio. I used an old Cat-Eye rear wheel and cadence sensor and I have it to the point where it is doing MPH and cadence back to the Arduino IDE.
Sunday, December 13, 2009
Quick Note – Windows Serial Port Enumeration
I am working to develop a serial port application on Windows. As part of this project I ended up wanting to code a routine to present a list of active serial ports on a PC.
What I thought would be an easy tasked turned into an evenings worth of work…
It turns out that there are a number of different ways to pull serial port information from a PC and they don’t all come up with the same set of ports.
The list of ports in some cases includes ports that are defined but not active or in some cases doesn’t include serial ports assigned to devices like modems. What a mess.
If anyone finds there way to this posting I wanted to give them a pointer to a site that helped me out a great deal. Check out Naughter Software’s EnumSerialPorts the shows 9 different ways to enumerate serial ports.
Thanks to PJ Naughter for putting this together and making it available to the rest of us.
It Worked for Me – FIOS Installation
We recently moved from Comcast to FIOS. The change was sparked by recent changes in Comcast’s cable service. We had been a long time Comcast customer and had a very good experience. However, when I compared bundled offerings from Comcast and Verizon the FIOS bundle came out better.
The week before Thanksgiving I put in a FIOS order and scheduled the installation for the next week. The day before the installation Verizon called to confirm that we would be home during the appointed window. The morning of the installation the Verizon Installer called to let us know that he would be arriving towards the middle of the installation window.
When the installer arrived we reviewed the setup. We looked at where the phone lines came into the house, the cable TV and found an appropriate power outlet that would be able to supply power to the box on the outside of the house.
It was an aerial delivery so shortly after we finished with the review another Verizon person showed up with a bucket truck and between the two Verizon personnel they installed the fiber to the house.
Overall the installation took four or five hours. The installer was very professional and even went to the trouble of having shoe covers for the inside work.
We now have a new box on the outside of the house, two phone lines moved over, three TVs connected and a new wireless Internet firewall/router. With one minor exception all parts of the installation went without a hitch. There was a problem with features on the two telephone lines which were reversed. A follow up email to customer service fixed this within 24 hours.
Two weeks after the install the TV service has been working flawlessly as has the Internet. One of the phone lines still has a problem with call forwarding.
Customizing the setup of the TV remotes and the Internet was easy to do. The Internet firewall/router even has a few bells and whistles that my previous Linksys and DLink boxes did not.
All in all a very good experience…
Time Flies – November 2009
Wow, looking back at my last post I see it was in October. November just flew by. Look for a couple of posts on activities that were squeezed in with everything else:
- FIOS Migration
- Garman GPS MAP 60 Acquisition
- Hacking around with Qt
- Arduino Robotics
Saturday, October 24, 2009
Arduino – SD Card
This afternoon’s project was to connect an SD card to an Arduino to be able to record log information on the card for later retrieval using a PC.
For the project I used an SD/MMC Mini Board from Futurelec. Futurlec has a number of interesting products which are reasonably priced. The order took a little over a month given the fact that they didn’t have the board in stock and due to international shipping. During the wait the folks at Futurelec were quite responsive to my queries via email.
I was using an atmega328p chip powered at 3.3v with an 8mhz oscillator. This made things easier as I didn’t need to worry about voltage dividers between the microprocessor and the SD card. The hardware I used was rounded out with a 512mb Kodak SD Card I had laying around.

For software I used Bill Greiman’s fat16lib which performed flawlessly. I tested my project with fat16info, fat16write and fat16tail with version 17 of the Arduino IDE.
The only problem I had was that I missed that the SD/MMC Mini Board has two pins labeled CD. One is in fact pin 1 from the SD card while the other is Card Detect. Pin 1 from the SD card is clearly labeled as such but I missed it the first time and connected to the other CD.
The pinouts that I used are below for reference:
I want to thank Bill Greiman for the great library he has put together. Also, my thanks to all of you who have posted information about your projects that helped me along.
For the project I used an SD/MMC Mini Board from Futurelec. Futurlec has a number of interesting products which are reasonably priced. The order took a little over a month given the fact that they didn’t have the board in stock and due to international shipping. During the wait the folks at Futurelec were quite responsive to my queries via email.
I was using an atmega328p chip powered at 3.3v with an 8mhz oscillator. This made things easier as I didn’t need to worry about voltage dividers between the microprocessor and the SD card. The hardware I used was rounded out with a 512mb Kodak SD Card I had laying around.

For software I used Bill Greiman’s fat16lib which performed flawlessly. I tested my project with fat16info, fat16write and fat16tail with version 17 of the Arduino IDE.
The only problem I had was that I missed that the SD/MMC Mini Board has two pins labeled CD. One is in fact pin 1 from the SD card while the other is Card Detect. Pin 1 from the SD card is clearly labeled as such but I missed it the first time and connected to the other CD.
The pinouts that I used are below for reference:
| Arduino Pins | atmega328p Pins | Description | SD Card Pins | SD Description |
| 10 | 16 | ssel | 1 | cd/dat3 |
| 11 | 17 | misi | 2 | cmd |
| 13 | 19 | sck | 5 | clk |
| 12 | 18 | miso | 7 | dat0 |
| vcc 3.3v | vcc | vcc 3.3v | 4 | vcc 3.3v |
| gnd | gnd | gnd | 3+6 | gnd |
Friday, October 23, 2009
Arduino – Serial Programmer
I decided that I wanted to experiment at programming the boot loader into chips myself. This started me down an interesting path.
After spending some time with Google and based on what I had around I decided that I would build a parallel programmer. For reference I used the directions on the Arduino site for a parallel programmer.
I modified the design to include a 28 pin dip socket so I would have something to put the chip in. After putting it all together and checking the connections with my trusty multi-media I couldn’t get it to work. I played around with it and with avrdude finally giving up after running out of ideas.
I went back to the drawing board and this time settled on a serial programmer that I could build with what I had on hand augmented with some parts from Radio Shack. Using this schematic I found in the adafruit forums.
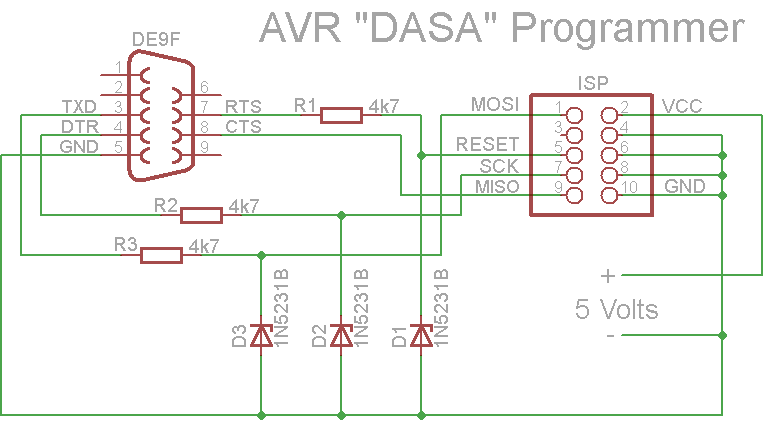
I modified the design to us a 6 pin isp connector rather than the 10 pin in the schematic. I also built a simple chip cradle with a 6 pin isp connector and a power connector.
Once I had completed building both the programmer and the chip cradle and checking them out with the multi-meter I plugged it in and…
Nothing. Avrdude running on the PC didn’t see the atmega chip.
After a good nights rest and some more time with Google I determined that my problem was that, as I was using a pre-loaded Arduino chip that was set to us an external crystal/oscillator that I needed to add one to my chip cradle.
Given the mess of wires connecting all the pins together on the underside of the chip cradle this wasn’t easy. However, soon I had a chip cradle with a socket for an external oscillator. I plugged in the oscillator and…
Nothing. Once again avrdude running on the PC didn’t see the atmega chip. Looking at the oscillator and the socket it appeared that the legs of the oscillator might be thin enough not to be making contact. A slight wiggle of the oscillator and success!
I fixed this problem by soldering the oscillator to 3 pins which fit the socket better and it has been working ever since.
Below are several pictures of the finished product.
As usual I need to thank a number of good people who have been down this path before me for marking the way with their posted results. The adafruit, Sparkfun and Arduino forums were invaluable.
Serial Programmer with DB9 serial connector.

Serial Programmer with Sparkfun 3.3v/5v regulated power supply attached.


Chip cradle with oscillator

Subscribe to:
Posts (Atom)