Saturday, September 10, 2011

Time Flies – January to September 2011

It has been a long while since my last post.  During this time I have worked on a number of things.

February – Programmatic access to Bluetooth, accessing DLLs generated with MS Visual C++ in MINGW, and wiimote coding.

March and April – An extension for Openframeworks to access the Picoscopic User Interface named ofxPUI.

April – A very simple interactive graphics framework in QT.

May – QT and wiimote using libwiiYourself.

July – Reconstituted work with the Arduino and RFM12 along with some work with Arduino and SD Cards.

August – gstreamer on Windows 7 and UPnP Servers for Windows 7.

My plan is to post some articles based on this work over the next couple of weeks.  We will see how it goes.

Sunday, January 2, 2011

Quick Note - Windows - Hiding User Accounts on Logon Screen

In regedit go to HKEY_LOCAL_MACHINE\Software\Microsoft\ WindowsNT\CurrentVersion\Winlogon

In the left panel, right click on Winlogon, select New and then select Key.

Type SpecialAccounts and press Enter

In the left panel, right click on SpecialAccounts, select New and then select Key.

Type UserList and press Enter.

In right panel of UserList, right click on a empty area, select New then select DWORD (32bit) Value.

Type in the name of the user account that you want to hide and press Enter. eg: Hidden Account.

In the right panel, right click on the user account name, select Modify and then:
  • To hide the user account – enter 0 (zero) and click OK.
  • To show the account – enter 1 and click OK.

Friday, December 31, 2010

It Worked for Me - Disk Imaging Windows XP

A month or so ago I had the need to create an image of a computer prior to wiping clean the disk to re-purpose the computer.

I was looking for an easy way to create an image copy on another computer which would enable me to browse the files on that image and access them individually.

After searching around I came across Macrium Reflect which enabled me to do just that and was free for personal use.

The process of creating the image and subsequently accessing files on it was easy and worked well.

If you are looking to do something similar I would suggest you take a look at this product.

Sunday, October 17, 2010

It Worked for Me - Building a Bootable USB Thumb Drive for Windows 7 Install using the Dell Factory Image.

This process took me a while to work out.  It all started when I purchased a slightly used system from my local computer store.  It was licensed for Windows 7 Pro x64 but was running Windows XP.
At the time I didn’t have a set of Windows 7 Pro x64 disks and the recovery disks I had for the existing system kept hanging during the disk format stage when trying to recover on the new system.
In order to get around both these problem I figured out that I could like the factory image from the first system and then build a bootable usb thumg drive and do the install.

The process took four stages:

1. Setup the usb thumb drive.
2. Download the Windows Automated Install Kit (WAIK) and then building the source files for a CD.
3. Configure the system drive on the target system.
4. Copy the source files onto the usb thumb drive and installing.

It took me a couple of times to run through all the steps and get it right.  I am sure there are other ways to do this and probably better ways but this is what worked for me.

Format usb thumb drive using the following commands in the DISKPART utility.  Be careful any data on the thumb drive will be erased.

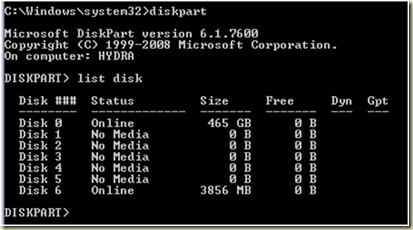
Determine what drive your usb thumb drive is using the “list disk” command in DISKPART and looking for a drive that is the size of your thumb drive.
image

In this case my usb thumb drive is drive 6.

Using the following commands setup the thumb drive.

DISKPART
select disk 6
clean
create partition primary
select partition 1
active
format fs=ntfs quick
assign
exit


Download the Windows Automated Installation Kit (WAIK).  This will allow you to build a set of directories that contain the files necessary to boot a system.

I used the commands from the article on this website.


CD "C:\Program Files\Windows AIK\Tools\PETools"
CALL copype.cmd x86 c:\winpe_x86
copy c:\winpe_x86\winpe.wim c:\winpe_x86\ISO\sources\boot.wim
copy "C:\program files\Windows AIK\Tools\x86\imagex.exe" C:\winpe_x86\iso\
oscdimg -n -bC:\winpe_x86\etfsboot.com C:\winpe_x86\ISO C:\winpe_x86\winpe_x86.iso
rem To remove the "Press any key to boot from CD" 
rem prompt during boot, remove the bootfix.bin file from 
rem the \boot folder within your mounted image. 
pause
Note that the third, fourth and fifth lines wrap to a second line in the blog post.
Copy the files from c:\winpe_x86/iso\ to the root of your usb thumb drive and you should now have a bootable usb drive.

I grabbed a copy of factory.wim and factory2.wim off the recovery partition of another Dell running Windows 7 Pro x64 and put them on the USB drive in a dell directory.

Next I booted the new system using the usb thumb drive and setup the hard drive on the new system using DISKPART.  I setup the hard drive as a duplicate of the other similar system I had.  Based on this I ended up with a 50MB partition, 15GB Partition and the rest of the disk drive.

I used basically the same steps as I had with the usb thumb drive except in this case I was on disk 0 and there were a couple more partitions.

I am not exactly sure what happens to the first partition.  It ends up getting labeled as OEM and becomes inaccessible.  In my case the second partition will be used for a recovery partition.

DISKPART
select disk 0
clean
create partition primary size=30
create partition primary size=15360
create partition primary
 
select partition 2
active
format fs=ntfs quick label=”RECOVERY”
set id=27
select partition 3
active
format fs=ntfs quick label=”OS”
assign
exit


If you want a recovery partition it needs to be set id-27 to make it hidden and it must come before the OS partition.  See the following information from Microsoft.

I then used the imagex command below to install the files onto the system.  In my case the usb thumb drive sometimes was e and other times i.
imagex/apply /ref e:\dell\image\factory2.wim e:\dell\image\factory.wim 1 c:

Note that the command line wraps in the blog and should all be typed in as one line.

I rebooted and the system started the final steps of the installation process.

A couple of times when I ran through this the system didn’t boot.  To fix this I inserted a recovery CD and run through it twice.  First it would find something and fix it.  The second time I would have to go to the fix startup option on the menu and it once again find something and then boot properly into the install.

As I mentioned for some reasons the recovery CDs I have built with my first Dell system would work on the new one.  Searching across the web I found someone who had a copy online and was able to  use that.

As I mentioned at the top of this post I expect there are better ways to do this but as this worked for me I wanted to post it to keep it around for my use and if it can help someone else out so much the better.

Sunday, September 12, 2010

It Worked for Me - Domain Registration

For the last couple of years I haven’t had any need to have an active DNS Domain.  However, a software project I have been working on has once again made this a requirement.  So over the last couple of days I have gone through the steps to establish one.

In my case registering a domain had two phases.  Phase one was to  to come up with a name and phase two was to find a Registrar.

Picking a Name

No matter what the project is naming naming something is always a challenge for me.  In the case of a domain name this was further complicated by the fact that any common name is already taken.

Faced with challenge I spent some time with google to see what help I could find and pretty quickly came up with a couple of sites.  I started with a search of “picking a domain name”.  This resulted in a number of sites that provide recommendations on the process of selecting a domain name.

I read several articles and armed with some information moved forward with coming up with a good name.  I found a couple of sites particularly useful in providing suggestions.  These sites are:

Along with generating names these sites both provide features to rapidly check the generated names.

After a while of playing around and a family vote I had a name and was ready to move on to the next step.

Picking a Registrar

I returned to google and typed in “domain registration review” and was completely frustrated by what I got back.  There was no shortage of sites / references returned.  There were primarily two problems:

  1. I was just looking for a registrar to register my names and then support DNS for me.  I wasn’t looking for a hosting package.
  2. Much of the information was dated.

After doing some reading I decided that I wanted the following features:

  1. Ability to register a domain name.
  2. The ability to host that domain name.
  3. The ability to privately register the domain name as I didn’t want my personal information accessible to anyone who ran a whois search.
  4. The ability to forward URLs and to forward Mail.
  5. An easy to use management interface.

My first stop was godaddy.com.  These folks appear to have the largest slice of the market.  Looking over the information I found about them a number of people had very good things to say about them and a number of people had not so good things to say about them. 

By the time I finished looking over their information I was pretty sure they could support anything I wanted.  However, there was a comment that resonated with me from what I had read.  The comment which appeared in a number of places was that they really pushed to up sell.  Some up selling I can understand but this sounded to be beyond extreme so I decided to look further.

My next stop was a hosting company, Total Choice Hosting, which I had used a couple of years ago.  I had used them to host a website for a project I was working on.  I had found them to be an excellent hosting provider that earned high marks from me for reliability and support.  Also, when it had come time to cancel my account they were very good about doing it quickly with no fuss. 

For these reasons I would recommend them to anyone and was sad to find that their pricing appeared to be much higher than many other folks.  Based on this and the fact that I wasn’t looking for hosting this time around I decided to move on.

I checked out DynDNS.com whose dynamic host service I have been using for a couple of years.  They have a free dynamic service as well as several services you can buy.  The challenge I had was that I couldn’t tell exactly what came as part of the registration/DNS hosting service.  For this reason along with the fact that they pricing appeared to be much higher than I expected I continued to look.

In my searching I looked at a number of other options:

  • domainmonster
  • yahoo
  • 1and1
  • hover
  • mydomain
  • namecheap

I finally decided to go with namecheap based on a best value approach. 

  • They were not the least expensive but they were very much in the ball park from a pricing perspective. 
  • They appeard to have a features I was looking for.
  • From there website it was easier to determine what service they provided.  (Domainmonster was another one that was good in this area.)
  • They showed up in enough reviews etc… to establish some sort of track record.

Registration

The last step was to register the name I had selected.  The registration process went very smoothly and when I was done I had a domain that was active and ready to use.

Next Steps

Beyond taking a bit of time with the management tool to get a feel for it I haven’t done anything with the domain yet.  As a result the real test of this whole process will have to wait for a week or two until I have the application up and running.

More to follow…

Saturday, July 17, 2010

Quick Note – Windows – Disable Windows Messenger at Login

Start, Run and enter GPEDIT.MSC

For "per machine" restriction, go to Computer Configuration, Administrative Templates, Windows Components, Windows Messenger.

For "per user" restriction, go to User Configuration, Administrative Templates, Windows Components, Windows Messenger.

Saturday, June 12, 2010

Quick Note - Arduino – Serial Programmer

Notes on using the Arduino – Serial Programmer

1. Connect a cable connecting the two 2x4 headers as shown by the red arrow.

2. Make sure that the headers are connected so that pins are connected 1 – 6 with the boards oriented as shown below. The green arrows are pointing at pin 3 on both boards with the pins number top row from left to right numbered 1 – 3 and bottom row 4 – 6.

SerialProgrammerSetup

3. A serial programmer will need to be configured in the Arduino programmers.txt file. Add the commands below to the file. This file in on Windows as of Arduino V018 is located in <arduino$root>\hardware\arduino.

serial.name=Serial
serial.communication=serial 
serial.protocol=dasa

4. The Arduino preferences file can be updated to print more information during the programming process by adding

  upload.verbose=true

On Windows this file is located in and the arduino directory in a users Application Data directory (AppData\Roaming in Windows 7).

5. Burning the boot loader did not work with the Prolific USB Serial Cable under Windows 7. Ended up using hardwired COM port on Windows XP system. Didn’t troubleshoot.